|
|
||||||
 |
|
 to communicate thinking.
 into the tool.
 and opened
 .
A saved file can be shared with peers or submitted to a teacher. The file will contain all solution steps from start to finish.
.
A saved file can be shared with peers or submitted to a teacher. The file will contain all solution steps from start to finish.| Fundamental Concepts and Skills (Link #1) | Algebra Tiles Connections |
|---|---|
| Working with numbers: Understanding and using numbers (e.g., being able to read, represent, count, order, estimate, compare, compose, decompose, and recompose numbers). |
Algebra Tiles can be used to:
|
| Recognizing and applying understanding of number properties: Understanding how numbers behave in operations and drawing on that understanding to master math facts and perform calculations. |
Algebra Tiles can be used to:
|
| Mastering math facts: Understanding and recalling math facts, using a variety of strategies. |
Algebra Tiles can be used to:
|
| Developing mental math skills: Doing calculations in the mind, with little or no use of paper and pencil or calculator. |
Using visual tools when learning to perform mathematical operations allows students to draw on these mental models and visualizations to perform mental calculations. Students will develop their mental math skills with Algebra Tiles as they:
|
|
Developing proficiency with operations: Performing calculations with ease, precision, and consistency and with a general understanding of number and operations, number properties, and their appropriate application in problem solving. |
Algebra Tiles can be used to:
|
Connecting Fundamental Math Concepts with mathies.ca (Draft)
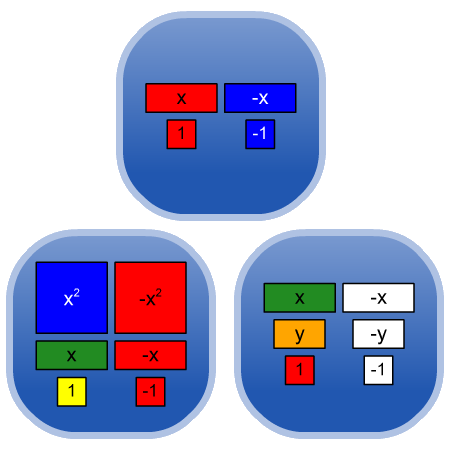
Integers can be represented by using the 1 and -1 tiles (or segments). Arithmetical operations can be performed by manipulating two or more representations.
A 1 tile can be dragged from the selection panel at the left onto the workspace. The multiplier button  at the bottom right of the selection panel can be used to bring 1, 2, 5, or 10 tiles onto the workspace at a time. Existing tiles can be copied to create additional tiles in the workspace.
If you select some 1 tiles, a negate button  appears which can be used to change them to -1 tiles. Alternatively, the negate button
  at the bottom left of the selection panel can be used to show the opposites of tiles and segments in that panel, which can then be dragged to the workspace.
In the example below, at the bottom of the workspace, the multiplication question 3 x (-4) is represented using an array model showing 3 rows of -4 tiles .
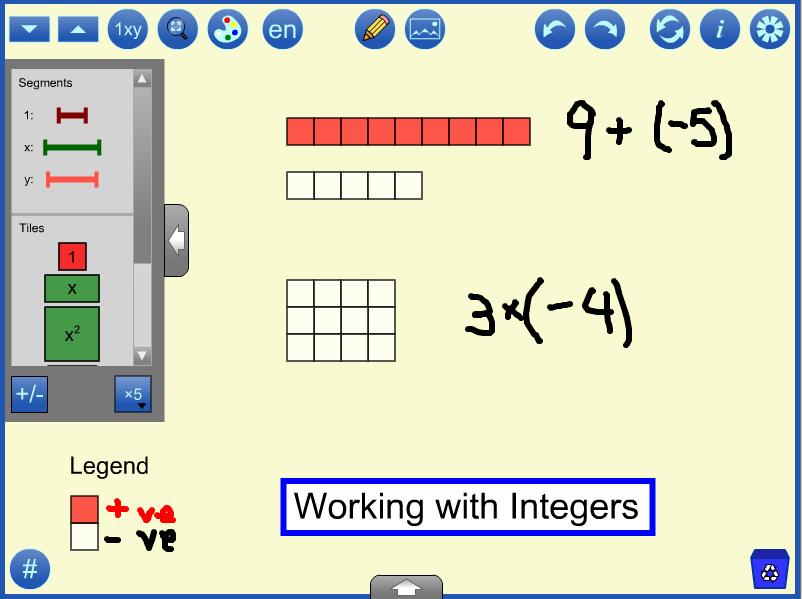
The addition at the top of the workspace, 9 + (-5), can be performed by combining the nine 1 tiles and the five -1 tiles. Using the tool, select the five -1 tiles and move them on top of the nine 1 tiles, the tool will “poof” the five opposites, leaving four 1 tiles. Each 1 and -1 pairing is referred to as a "zero pair".
If you open Sample File 1 and press the redo button twice  , you will see the result of “poofing” the zero pairs.
A legend is supplied to establish the colour being used for 1 and -1. These colours can be changed in the tool by:
 at the top of the screen and choosing one of six common colour sets provided.
 , including a setting that:
and can be hidden or shown using the arrow on its panel.
, including a setting that:
and can be hidden or shown using the arrow on its panel.Algebraic expressions can be represented using tiles or segments. Arithmetical operations can be performed by manipulating these representations. Expressions related to area and perimeter of rectangles can be modelled directly.
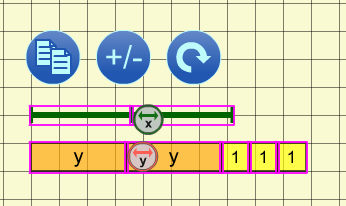
Adding expressions can be thought of as combining tiles. In the example below, the tiles are combined in an order that allows them to be renamed as 8x + 2y + 4. This is a powerful visual image of what it means to 'simplify by collecting like terms'.

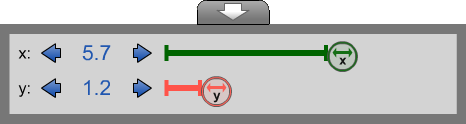
Expressions can be evaluated at specific variable values. In the example above, a number line is used to measure the length of the rectangle after x has been set to 1.5 and y to 3. Notice that each x tile measures 1.5 on the number line and each y tile measures 3 units.
The Summary dialog is shown when  is clicked. Clicking on the dialog's Value tab will allow the work to be verified. The combined tiles are selected and the value of the selected tiles is listed as 22, which agrees with the measurement. Students might be asked to explain why the value of the total is twice as big as the selected and how the expression for the total reinforces that conclusion. See Sample File 2.
By default, opposite tiles poof (disappear) when combined, extending the "zero-pair" principle for Integers to algebraic terms. Students might be asked to represent 3x – 4 in at least six different ways.
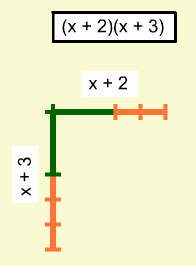
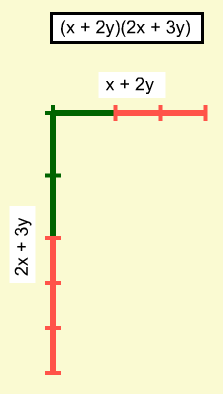
topPolynomials can be multiplied using an area model. A rectangle is formed with dimensions equal to the two factors. The product of the two factors is represented by the area of the rectangle and is expressed in terms of the variables in the dimensions, as in the two examples below.
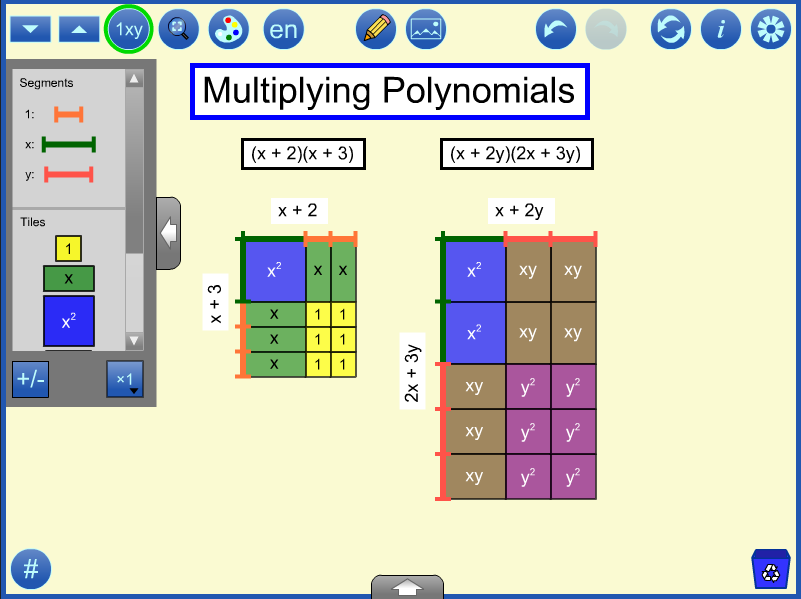
Segments can be used to create the dimensions of the rectangle to be filled in.
Once the tiles are used to fill in the area, the values of the variables should be adjusted to show that the rectangular area represents the correct product for every value of the variable(s) not just specific instances. Then an expression for each product can be determined. Here the products are x2 + 5x + 6 and 2x2 + 7xy + 6y2. Students might be asked what is the same and different about the two multiplication questions.
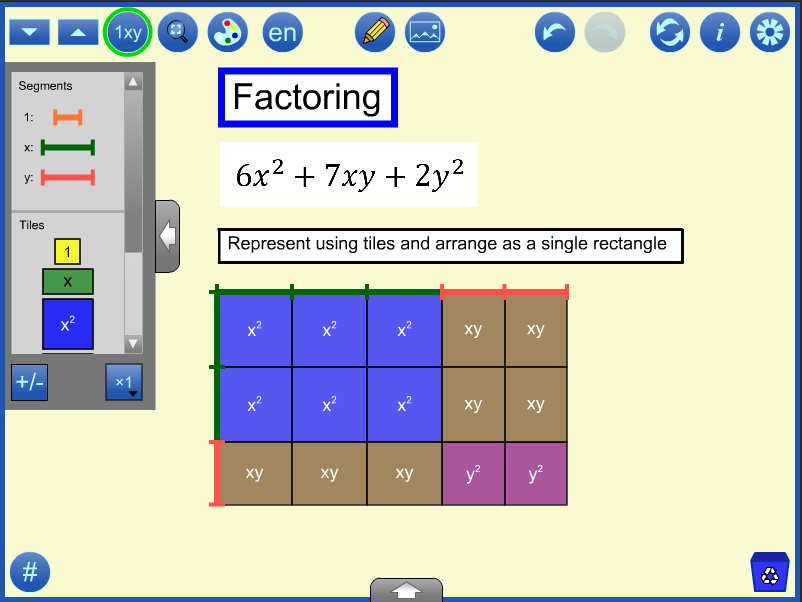
topFactoring is the inverse operation of multiplying in that the polynomial is expressed as a multiplication of two or more factors. When using an area model, this involves arranging the tiles representing the polynomial into a single rectangle. To do this with the Algebra Tiles tool, represent the polynomial then drag the tiles to form a single rectangle. Identify the dimensions of that rectangle as the factors of the polynomial.
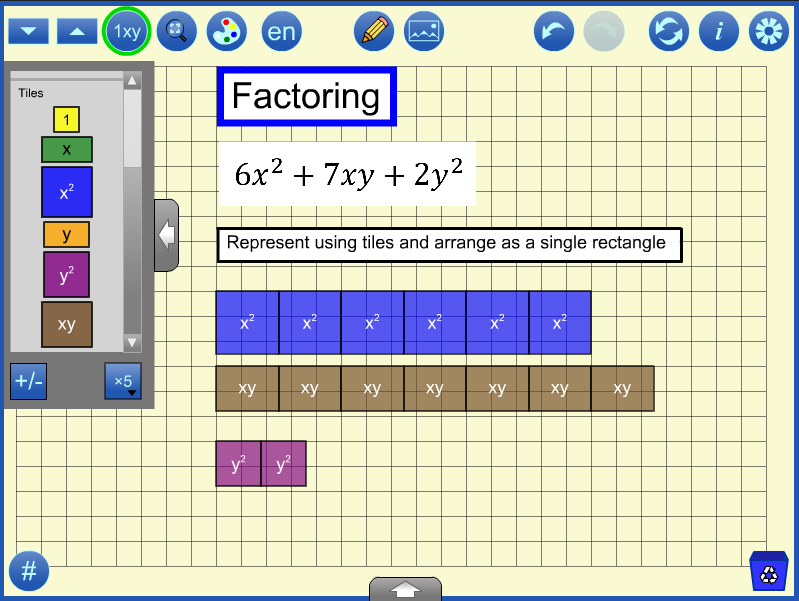
Once the rectangle is formed, segments can be used to mark off the dimensions which are used as factors in the result, (3x + 2y)(2x + y). The variable values should be adjusted to demonstrate that the factors are the same for rectangles of varying sizes. (If you open sample file 4 and click redo repeatedly, you will see this).
Equations can be represented using tiles or segments and solved by trial and error or by balancing.
In the trial and error example below, the equation is modeled using segments. A number line from the annotation tools is used to mark off 10 units. The value of x is changed by sliding the controller on the workspace or in the values panel at the bottom of the screen, until the length is 10 units. (If you open sample file 5 and click redo, you will see this).
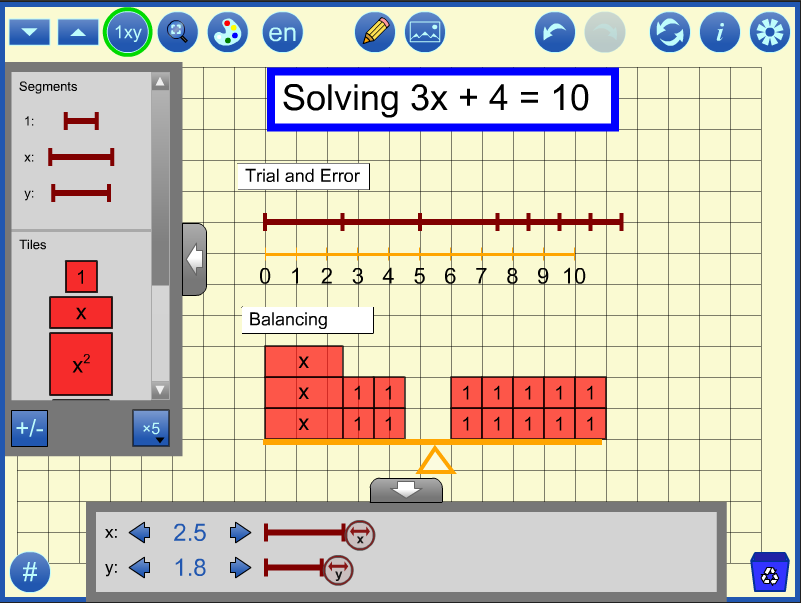
A balance is drawn using the annotation tools, and tiles are used to represent the equation. Using the principle that equal quantities can be added or removed, 4 is removed from both sides (or -4 added and poofed). The six remaining unit tiles on the right are then arranged in 3 groups of 2 to match the left side in order to conclude that x = 2 (If you open sample file 5 and continue to click redo, you will see how this might be performed using the tool).
In the example below, the equation x2 = 18 is solved to find the principal square root of 18. The summary panel allows you to see the value of x2 as x changes. Change the number of decimal places in the settings from 1 to 2 to 3 decimal places to get a finer and finer approximation.

Trial and Error can also be used to solve a system of equations like:
2x + y = 15,
x + 3y = 20
Algebra tiles can be used to explore various patterns and related functions.
For example, consider the expression (x + 1)2.
This expression can be represented using algebra tiles.
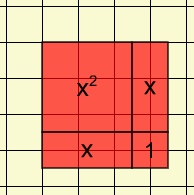
This image shows the representation using the default value of x = 2.5. Physical manipulatives are designed using an x value of approximately 5.2. Both of these instances illustrate the expression at one particular value. However, the advantage of using the mathies Algebra Tiles tool is that the value of x can be adjusted.
When x = 1, the representation is made up of 4 unit squares so the value of the expression is 4.
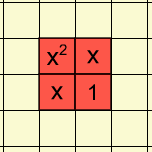
How does the representation change as the value of x increases?
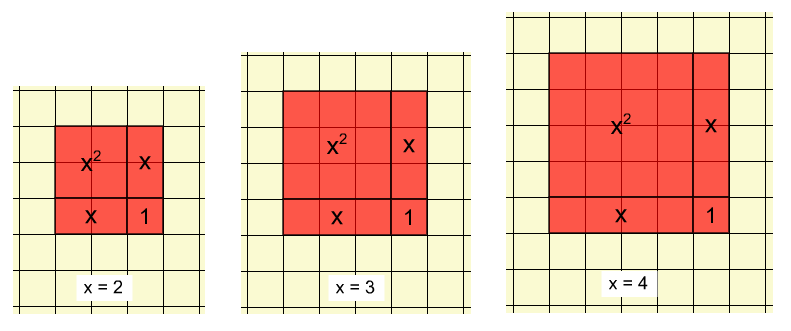
Notice that for each value of x, the representation forms a square with side lengths (x+1). As the value of x changes, the side lengths change, the areas of the x and x2 tiles change and the 1 tile remains constant.
The value of the expression for each value can be determined algebraically and can be confirmed either by counting the grid squares or showing the value tab of the summary dialog . e.g., when x = 3, the value of the expression (x + 1)2 is 16.
Each of these representations can be thought of as a term of a pattern or a point on a graph. The annotation tools can be used to created a table of values and/or a graph.
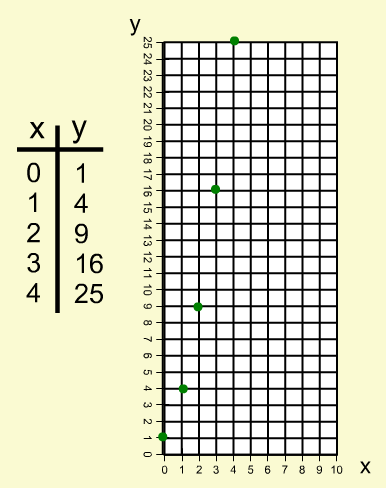
The function y = (x + 1)2 is of course a continuous function. Values in between the integral points can also be illustrated using the tool.
top in the Settings dialog and supply the URL, or
 in the tool.
SampleClick to open in the tool - desktop only |
URLType or copy into Open WWW text box, or save locally by right-clicking or hard-pressing |
|
Working with Integers
|
https://mathies.ca/files/examples/AT_Ex1.xml |
|
Working with Expressions
|
https://mathies.ca/files/examples/AT_Ex2.xml |
|
Multiplying Polynomials
|
https://mathies.ca/files/examples/AT_Ex3.xml |
|
Factoring Polynomials
|
https://mathies.ca/files/examples/AT_Ex4.xml |
|
Solving Equations
|
https://mathies.ca/files/examples/AT_Ex5.xml |
| Button | Description |
 |
Unit SizeDecrease / increase the size of a unit tile. |
 |
LabelsHide / show the labels on the tiles in the workspace. |
 |
Size to FitAdjust the values of x and y to the maximum values that will still allow objects to fit on the stage. |
|
|
Choose Colour SetShows a dialog with options to select any of the six predetermined colour sets.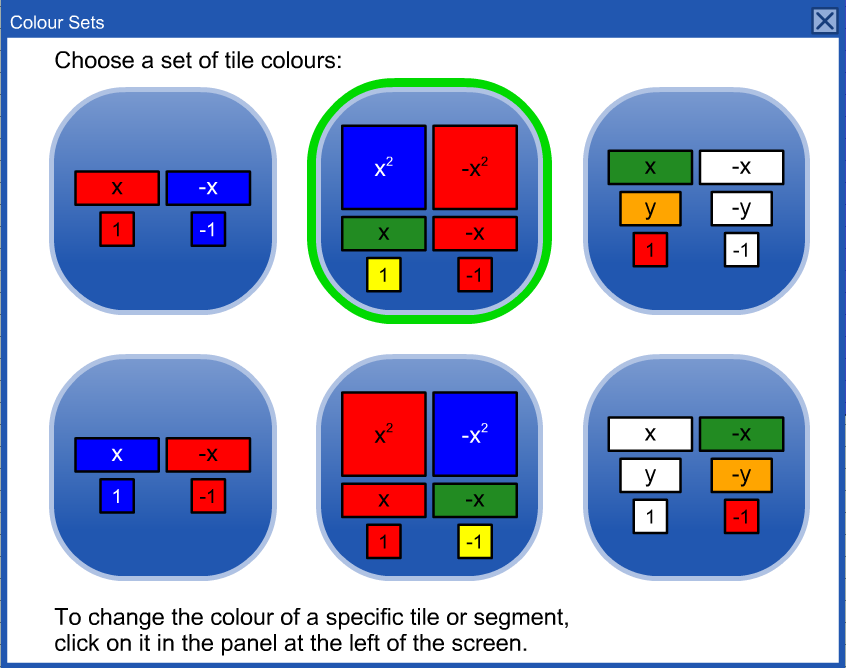 |
  |
English / FrenchSwitch between English and French. |
|
|
Annotation ToolHide / Show a wide variety of Annotation Tools which can be used to communicate thinking. |
|
|
Insert Image ButtonInsert images into the tool. More details. |
 |
Undo / RedoStep backward or forward through the actions taken with the tool. This feature is not only useful for backtracking when a misstep is made, it enables a student to demonstrate their work from the start to the finish. The student can press Undo until they are at the start of their solution and then click Redo repeatedly, explaining each step. Note: Undo / Redo is not available for annotation objects. |
 |
ResetDelete all work and return the tool to its starting state. |
 |
InformationShows a dialog with a link to this support page, a feedback form as well as copyright details and version number.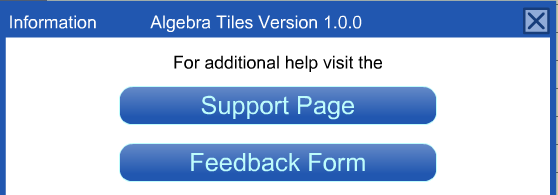 |
|
|
SettingsShows the settings dialog.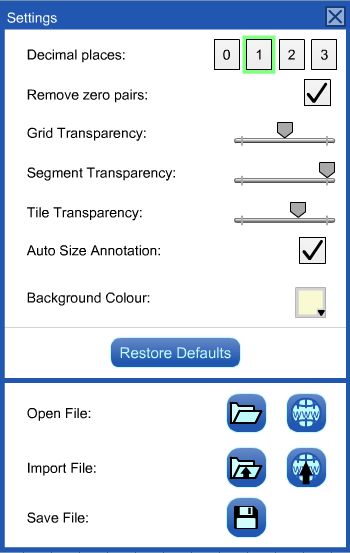 Select the number of decimal places used for values of x and y. This setting is useful when evaluating expressions or solving equations. Remove zero pairs controls whether or not opposites will poof (disappear) when tiles in the workspace overlap. The Auto Size Annotation setting is selected by default. This means that if the unit size is changed, any annotation in the workspace will be scaled to match. Open, Import and Save files (see File Operations for more details) |
|
|
Negate ButtonShow the opposites of the tiles and segments in the selection panel. |
 |
Number of Copies to DragSet the number of copies to drag from the selection panel. |
|
|
SummaryShows the summary dialog which contains a Count and a Value tab.
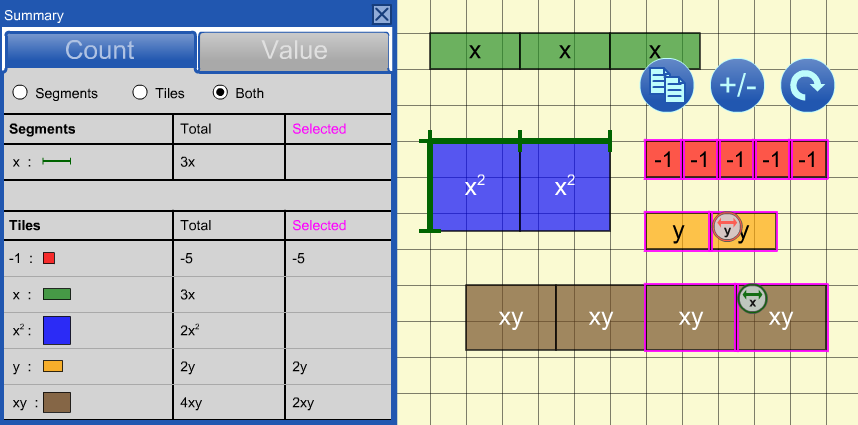 The Value tab shows an algebraic expression and its value when evaluated at the given values of x and y.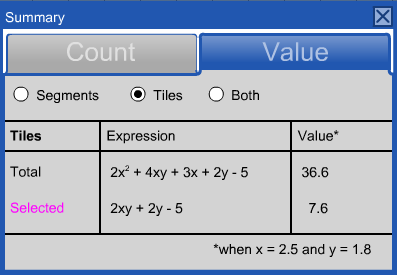 |
 |
Recycle(in the workspace)Click to clear selected objects. If nothing is selected, the entire workspace will be cleared.
|
 |
CopyMake a copy of the selected objects. |
|
Negate SelectedChange the selected tiles and segments in the workspace to their opposites. |
 |
Change OrientationChange the selected tiles and segments from horizontal to vertical and vice versa. |
 |
Multiple SelectTo select objects draw a marquee rectangle around them.Hold down the SHIFT key when drawing a marquee rectangle to add to the previous selection. Click an object to add or remove it from the selection. Selected objects can be moved, copied, negated, re-oriented, or recycled as a group. |
 |
Adjusting ValuesThe values panel is shown to the left.The value(s) of the variable(s) can be adjusted by:
|
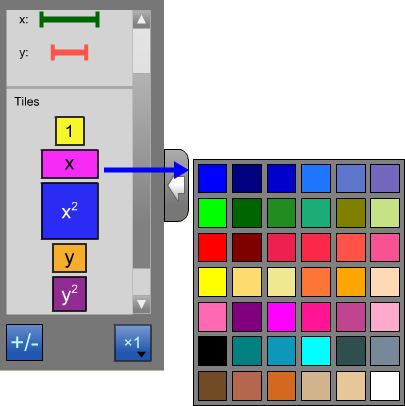 |
Configure the Selection PanelClick on a tile or segment in the selection panel to change the colour of all objects of that type. |


 found on the selected objects in the workspace (see image in the Multiple Select row above)