Version française de cette page
Instructions
Examples
Keyboard Shortcuts
Instructions
The newer
mathies Tools have the Insert Picture Button

next to the Annotation Button

.
When you click the button, you will get a dialog that allows you to choose a file from your device.
Navigate to find and select the image you would like to insert.
Exactly how this happens depends on the device you are using and the operating system on that device, whether Desktop, iOS or Android.
On desktop computers multiple images can be selected and inserted at the same time. On other devices, images must be inserted one at a time. You can insert as many images as you like.
The inserted image appears on the screen in its selected state.
To
deselect an image, click outside of it; the handles will no longer be visible.
Tools will not allow other objects to be selected at the same time as an image.
To
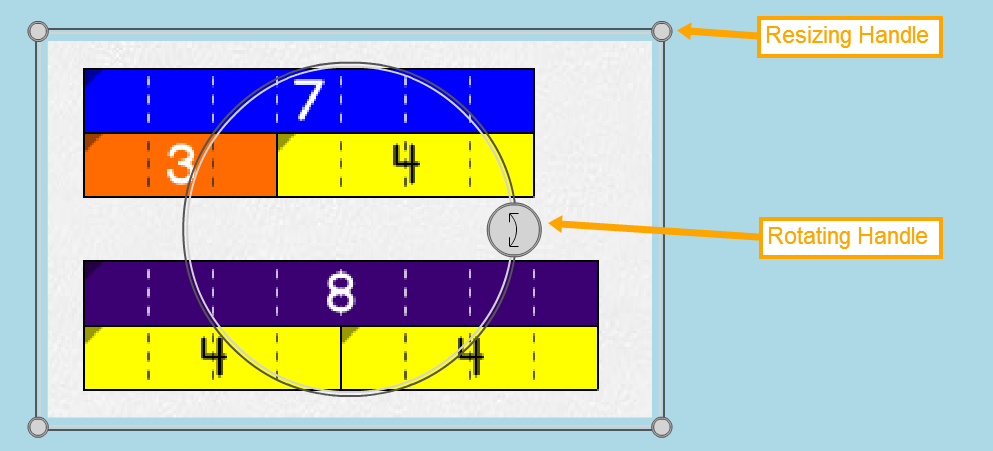
select an image, click on it. When selected, the resizing rectangle with its four resizing handles and the rotation wheel with its rotating handle are visible. When you select an image, it will be placed on top of the others.
To
move a selected image, drag it. Be sure to select it first. Then click on it again to drag it.
Drag the
resizing handles to make the image larger or smaller. The image will maintain its proportions and will not shrink past a certain point.
Drag the
rotating handle to have the image rotated 90°, 180°, 270° or 0°. When the image is really small, the rotation wheel may disappear.
If you want to rotate a small image, you may have to first resize it bigger, then rotate it and resize it smaller.
To
delete a selected image, press the recycle bin

or drag the image to the recycle bin. The recycle bin enlarges when the image is in the correct spot.
To
duplicate an image, select it and click the copy button

. The duplicate will be selected so that it can be resized or repositioned.
Operations with images are not currently reversible using Undo and Redo. Watch for this improvement in the future.
Hint: Since images are placed under tool objects, if possible, insert images, size and position them prior to creating representations with the tool.
top
Examples
Inserting images can be used in all kinds of creative ways. You can:
- Include a picture of a real-life situation to enhance your work
- Take a photograph of some work with a physical manipulative. Insert this picture and use the tool to annotate thinking or compare with a virtual representation.
- Insert a picture of the question that is being worked on
- Take a screenshot of some work with one digital tool and insert it into another tool.
Communicating Thinking Using the Notepad Tool
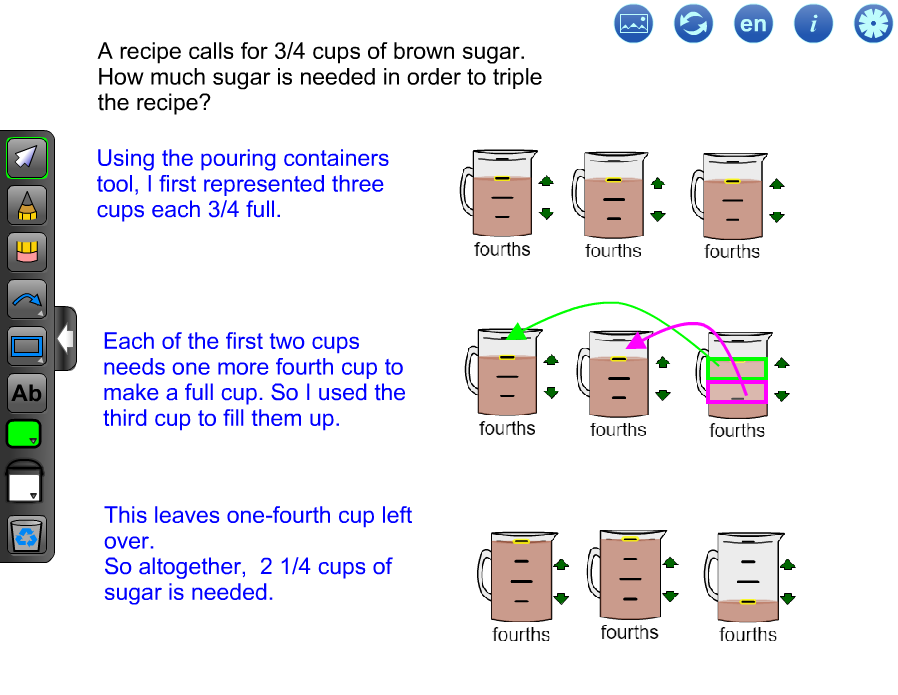
In this example, the
Pouring Containers tool was used to solve the problem. Since the annotation features are not available in this tool,
screenshots of the initial representation of measuring cups and the final solution were taken. These pictures were then inserted into the
Notepad tool where the annotation features were used to explain the solution.
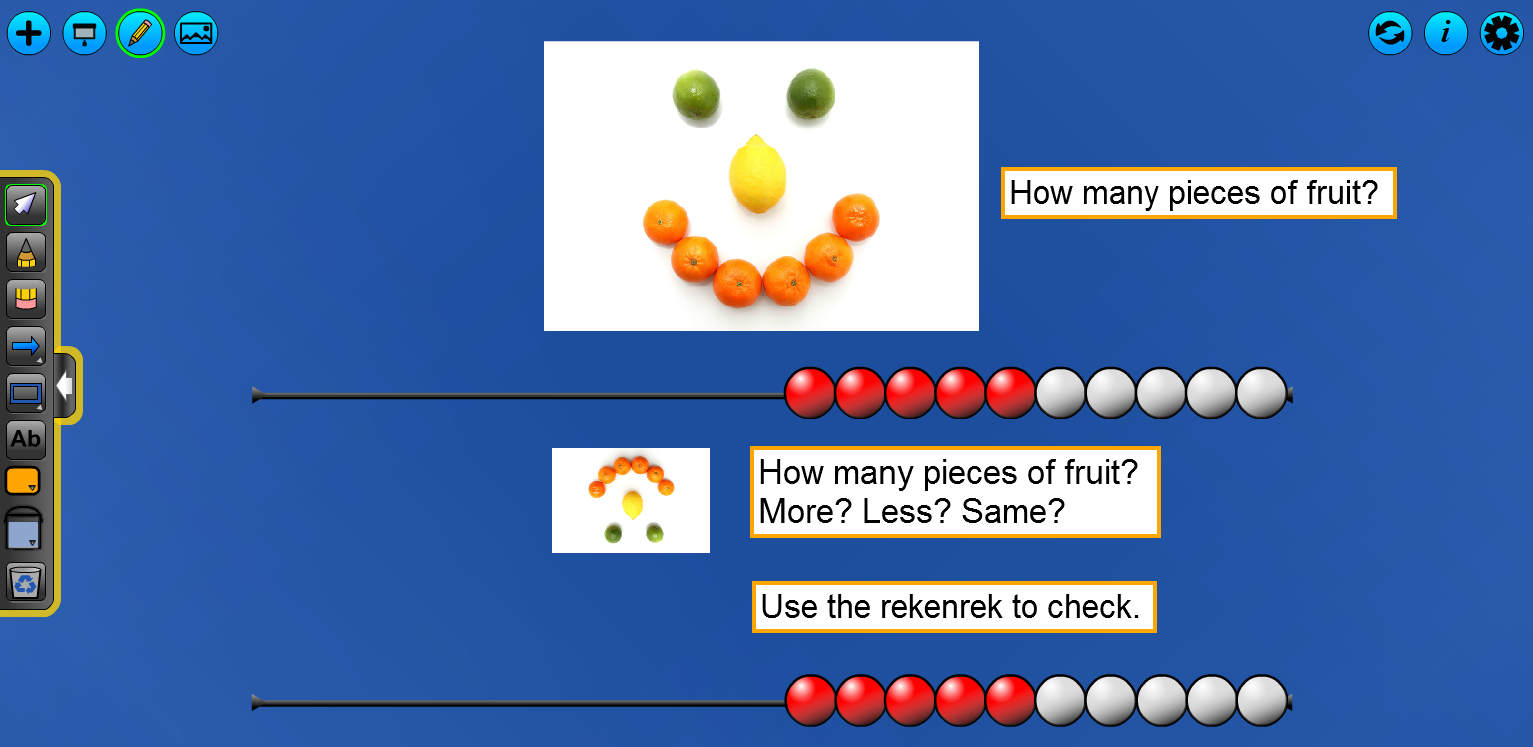
Investigating Conservation of Number Using Inserted Images
Conservation of number and one-to-one correspondence are two fundamental counting principles that children need to master. Young students often struggle to understand that the number of items in a set is not affected by changing the size, position, or amount of space between objects. Below is an example of how this concept could be posited to the student using the
Rekenrek Tool.
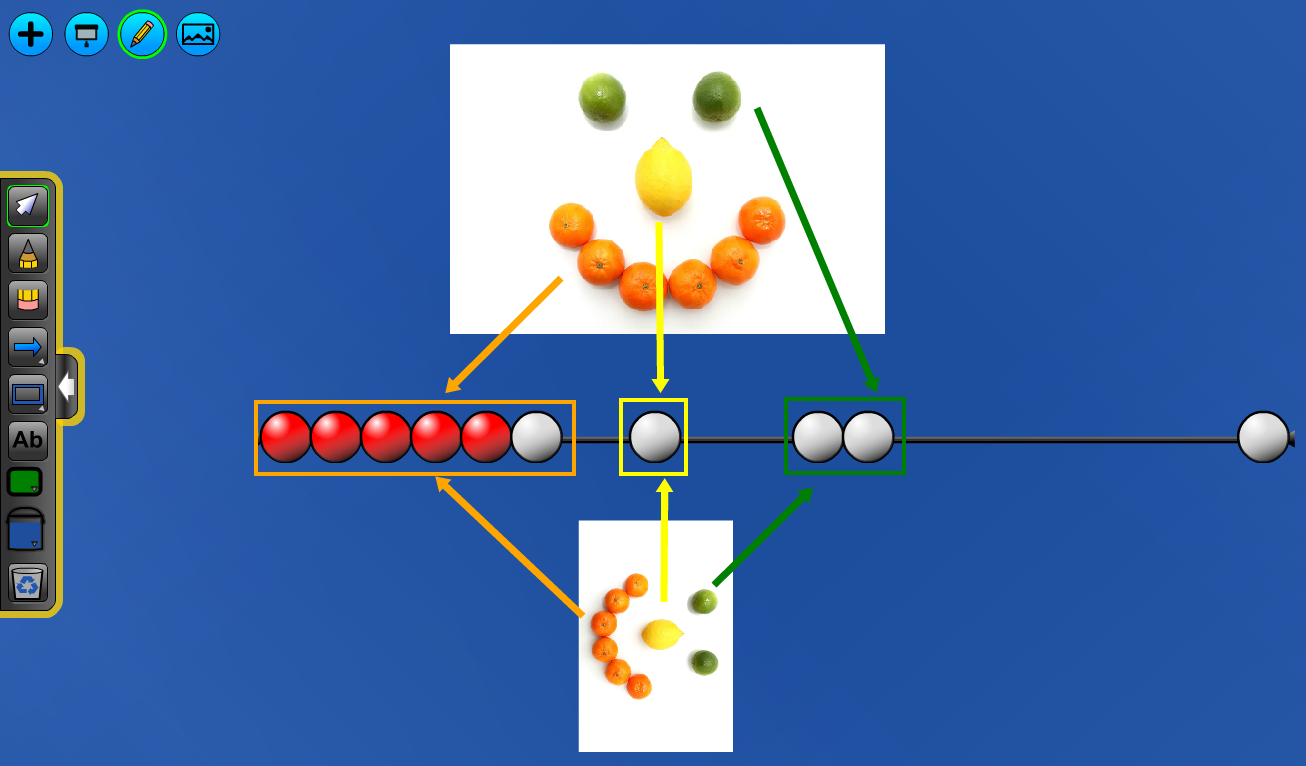
Encourage students to press the annotation button
and use the annotation features to explain their thinking. Students might use the annotation features to map the fruit in each image to the rekenrek beads to convince themselves there is the same number of objects in each image regardless of the orientation or size of the image. Colour coding the annotation to match the fruit helps to make a visual connection between representations.
In selection mode

students are able to interact with any of the images, beads or existing annotation without having to change modes.
As a next step, ask students to insert images of other sets of objects and then rotate and resize the images to investigate which attributes stay fixed and which change. Students may want to create their own sets of objects using various manipulatives and then take a picture to insert.
Using Inserted Pictures to Represent Data - Preserving the Average
Another fun and useful way to use multiple inserted images is to create pictographs. The mathies
Notepad tool now allows the inserting of multiple pictures and has a handy opening dialog that allows the user to choose what background they would like to start with. It also allows the user to choose to have the images sit on top of their grid (like in the example below) or underneath the grid so the grid lines explicitly partition the image.
In the example below, the windowed grid has been selected. A pictograph is used to show one solution to this problem:
You are at a petting zoo where it costs the same amount to give one of four animals a treat. You have enough money for 12 treats.
- Distribute the treats among the animals any way you like.
- Calculate the average number of treats per animal.
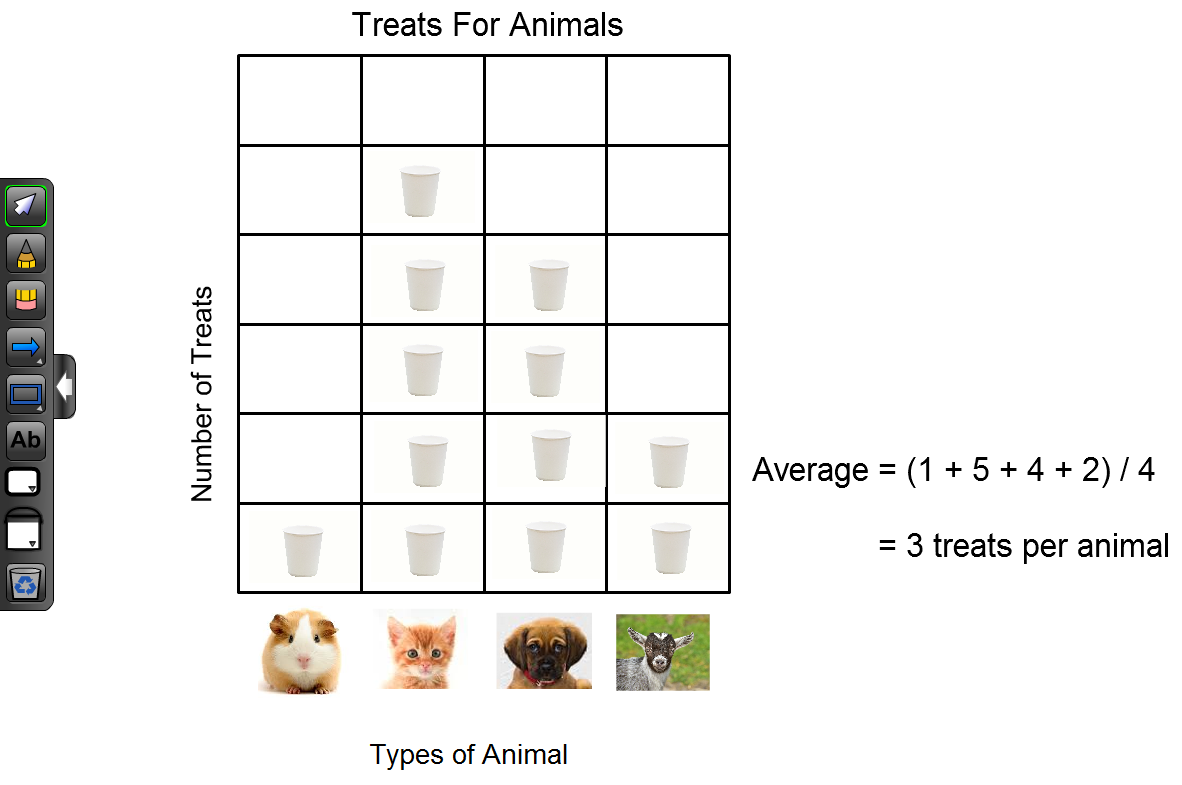
Ask each student to distribute the treats in a different way and then calculate the average. As a whole class, share several different solutions and discuss the following:
- What do you notice about the average?
It is always 3 treats per pet! Is that surprising to you? Can you explain why the average is always 3? What average would you expect if you had 24 treats to distribute? 30 treats?
- If you tell your friend that you gave out an average of 3 treats per pet, could your friend tell you how many treats you gave to the kitten?
- Does the average let you know how fair the distribution was?
This activity will reinforce the idea that a total can be decomposed into many subsets and that the average is preserved throughout this decomposition and redistribution. The task might also show that using averages can strip important details from data that provide interesting and useful information (such as a bias towards kittens and puppies).
Inserting Images for Fun and Profit - Comparing and Preserving Monetary Amounts
Here is an example of using the image insert feature to compare the costs of two stuffed bears within the mathies
Money tool. Of course, to make it more fun in class and to put a personal touch on the task, you could take pictures of objects in the classroom and have students pretend to sell them. This is one example of an activity that could be used to support junior students in developing proficiency with operations involving money.
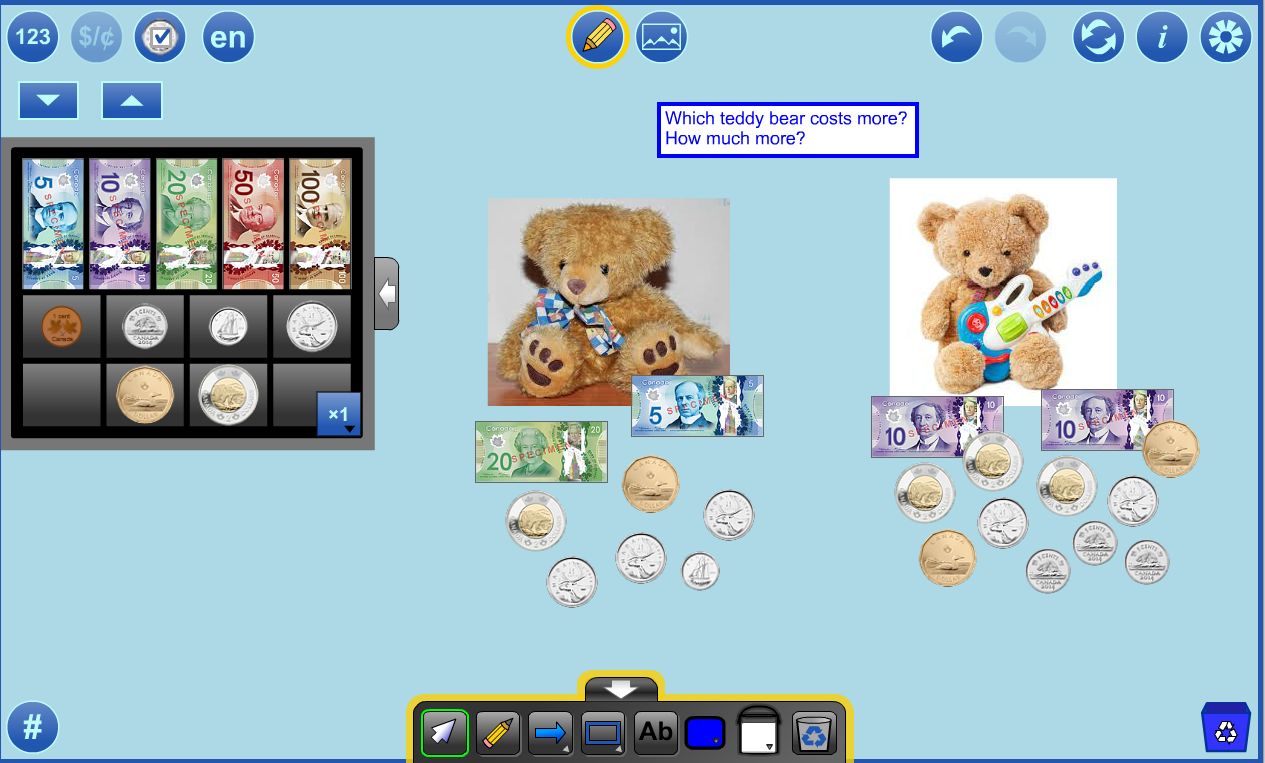
Students should be encouraged to compare the values using different strategies. Possible solutions could include using a take-away strategy, or alternately, mapping the currency values to each other (mapping a 20 dollar bill to two 10s for instance). Other scenarios like ordering food at a restaurant or shopping for sale items can also be used. How much for those snazzy shoes you’re wearing?
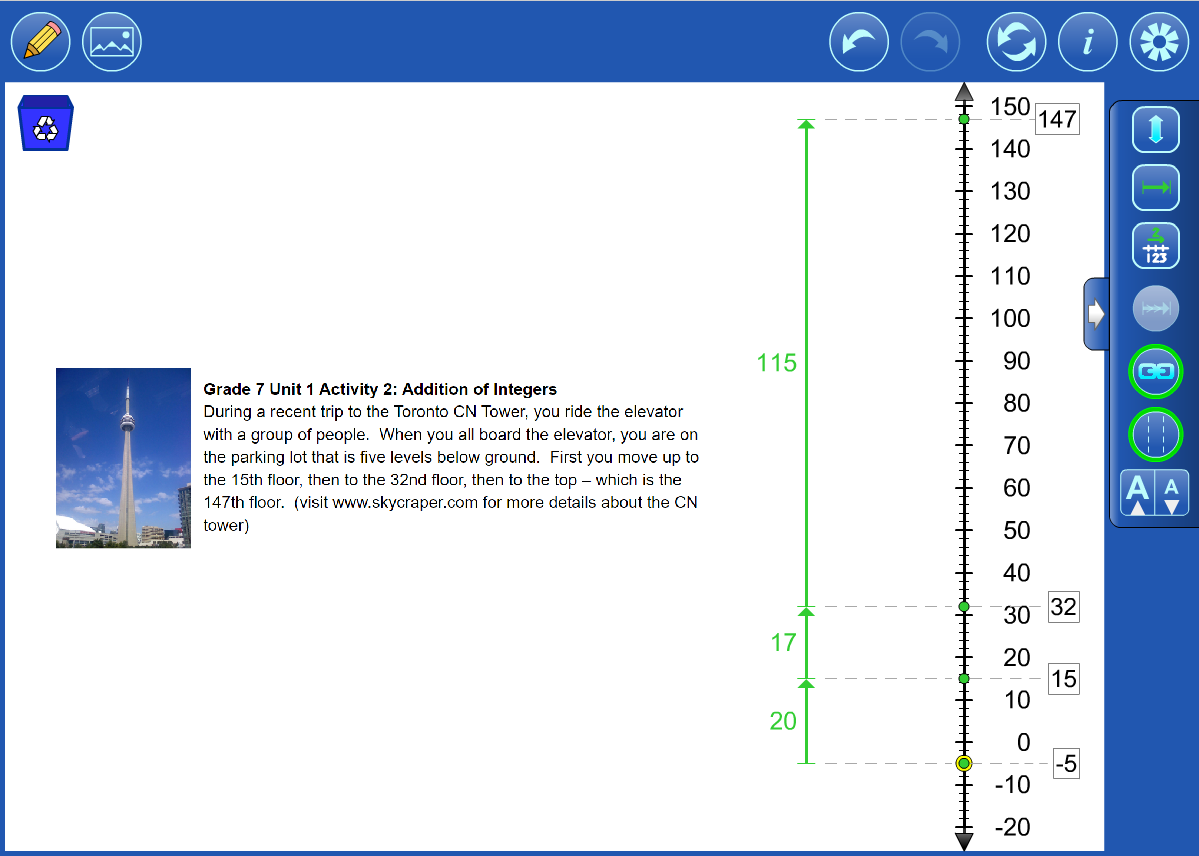
inserting Images - Real World Examples & Text Questions
Another advantage of being able to insert images is the ability to take a picture of a question which is being worked on and insert it right into a tool, like the
Number Line. In this way, the tool remains the site of the problem solving. After the student is done a screenshot can be taken to preserve and share evidence of their work. This example, provides intermediate students an opportunity to develop proficiency with integer operations.
Inserting a Picture of a Geoboard
The mathies
Notepad tool can be used as a geoboard by inserting an
image of the grid. This image was created using the
instructions on The Geometer's Sketchpad site. In the example that follows a student uses
Pick's Theorem to calculate areas.
 top
top
Keyboard Shortcuts for Selected Images
NOTE:
- SPACE + C means hold the space key down and tap the C key.
- Sometimes CTRL (Apple command key) will work instead of SPACE.
- These shortcuts only work on a selected image.
| Command |
|
Keyboard Shortcut(s) |
|
| Deselect All |
|
ESC |
|
|
| Copy |
|
SPACE + C |
|
|
| Delete |
|
SPACE + X |
DELETE |
BACKSPACE |
| Rotate |
|
SPACE + R |
|
|
Movement of images uses the arrow keys, and the standard WASD and IJKL layout.
|
W |
|
|
|
|
|
Up Arrow |
|
|
|
|
|
I |
|
| A |
|
D |
|
or |
|
Left Arrow |
|
Right Arrow |
|
or |
|
J |
|
L |
|
S |
|
|
|
|
|
Down Arrow |
|
|
|
|
|
K |
|
top